Rocket Project:
Cover Letter
The objective of The Rocket Project was to work with a partner to navigate the challenges and successes of building a bottle rocket. We were asked to work together to try and understand and then test the physics and math behind launching a rocket. Through the process of creating a hypothesis, experimentation, and revision we were able to apply what we learned about position, velocity, projectile motion, and the quadratic formula to create the best rocket we could!
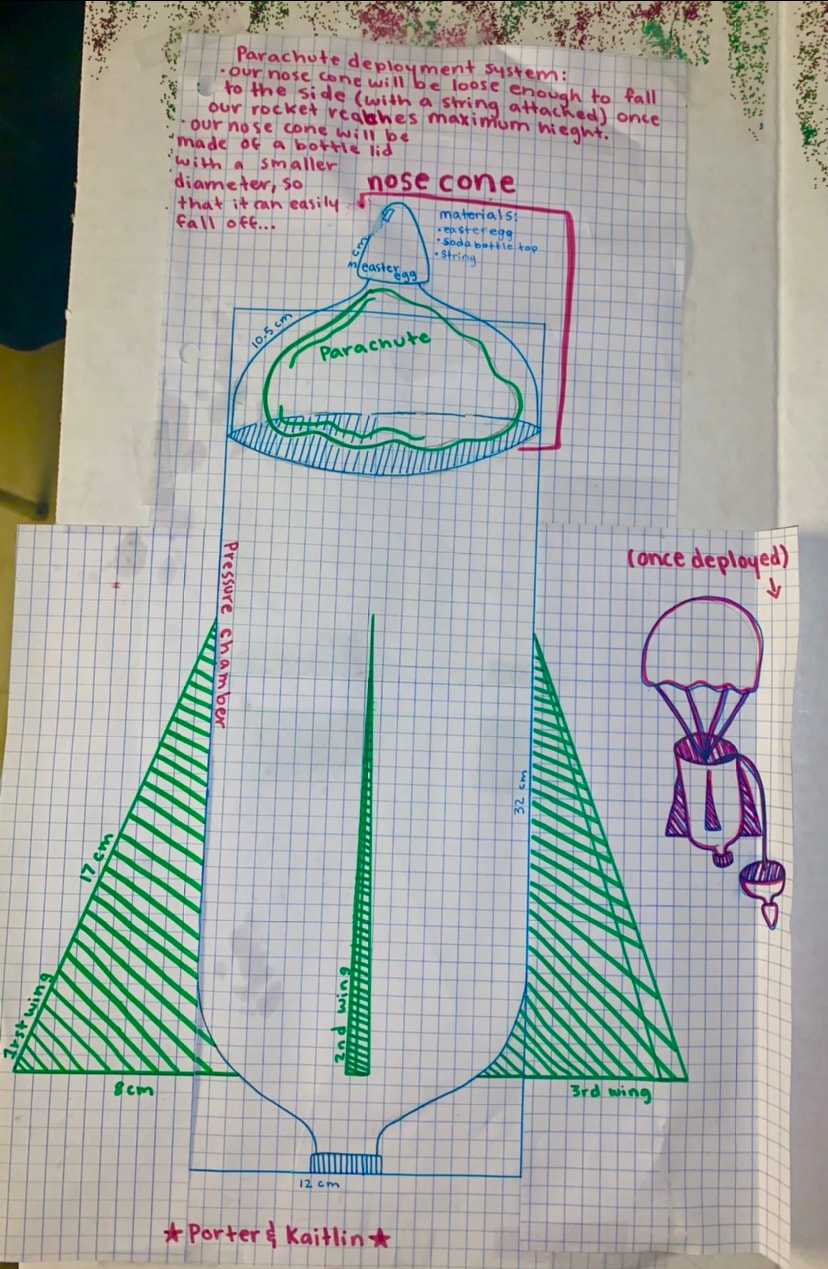
Firstly, Kaitlin and I had to learn about Position which is the height of a projectile at any given time, and in our case, this would be our rocket. Then Velocity, which is when there is a change in position at any time. Acceleration is the measurement of the change in velocity of our rocket when in motion. In Ande’s class, we began to study Quadratic Functions and a quadratic function is a parabola otherwise known as a symmetrical curved line formed by positive and negative variables. We used quadratic functions because they can accurately represent the launch and fall of our rocket on a graph. In class, Kaitlin and I used the information above to aid us in the Engineering Design Process, which is a seven-step process that is used in hopes of creating a successful product. First, my partner and I needed to recognize the constraints and limitations of this project in relation to our specific design process. This meant having a common understanding of what was reasonable and unreasonable in regards to the size, shape, time, and materials we would have access to. Secondly, with our constraints in mind, we could begin researching popular bottle rockets to gain a better understanding of what usually works and doesn’t work when constructing a rocket. Then, we used the images we found while researching to create a perfect blueprint of what we wanted our rocket to look like. Our blueprint also consisted of the specific measurements and materials we planned to use in the next couple of days. The fourth step was to get peer and teacher feedback on our blueprint before we started construction, and this was so that we could waste as little possible time building our rocket in hopes to maximize its efficiency. Step five was to gather materials and begin building our rocket because with the limited time we wanted to perfect our design as soon as possible to get ready for step six. Step six was doing multiple test launches of our design to see what works and doesn’t work. We ran two test launches of our bottle rocket and recorded the data we had observed as well as took note of our peer’s rocket performances. Finally, step seven was to take all of the information we had gathered from teachers, peers, and our own test launches to finalize our rocket design for the official rocket launching exhibition.
The objective of The Rocket Project was to work with a partner to navigate the challenges and successes of building a bottle rocket. We were asked to work together to try and understand and then test the physics and math behind launching a rocket. Through the process of creating a hypothesis, experimentation, and revision we were able to apply what we learned about position, velocity, projectile motion, and the quadratic formula to create the best rocket we could!
Firstly, Kaitlin and I had to learn about Position which is the height of a projectile at any given time, and in our case, this would be our rocket. Then Velocity, which is when there is a change in position at any time. Acceleration is the measurement of the change in velocity of our rocket when in motion. In Ande’s class, we began to study Quadratic Functions and a quadratic function is a parabola otherwise known as a symmetrical curved line formed by positive and negative variables. We used quadratic functions because they can accurately represent the launch and fall of our rocket on a graph. In class, Kaitlin and I used the information above to aid us in the Engineering Design Process, which is a seven-step process that is used in hopes of creating a successful product. First, my partner and I needed to recognize the constraints and limitations of this project in relation to our specific design process. This meant having a common understanding of what was reasonable and unreasonable in regards to the size, shape, time, and materials we would have access to. Secondly, with our constraints in mind, we could begin researching popular bottle rockets to gain a better understanding of what usually works and doesn’t work when constructing a rocket. Then, we used the images we found while researching to create a perfect blueprint of what we wanted our rocket to look like. Our blueprint also consisted of the specific measurements and materials we planned to use in the next couple of days. The fourth step was to get peer and teacher feedback on our blueprint before we started construction, and this was so that we could waste as little possible time building our rocket in hopes to maximize its efficiency. Step five was to gather materials and begin building our rocket because with the limited time we wanted to perfect our design as soon as possible to get ready for step six. Step six was doing multiple test launches of our design to see what works and doesn’t work. We ran two test launches of our bottle rocket and recorded the data we had observed as well as took note of our peer’s rocket performances. Finally, step seven was to take all of the information we had gathered from teachers, peers, and our own test launches to finalize our rocket design for the official rocket launching exhibition.
Calculations
Time of Max Height:
The first step in finding the time of max height was to videotape our final
rocket launch exhibition and begin to count the number of frames per second. To find this, we must consider that an average iPhone shoots 30 frames per second so we must divide whatever number of frames by 30. In our case, I counted 27 frames per second from launch to maximum height and then divided 27 ÷ 30 which equals 0.09. Unfortunately, our rocket was out of frame for a portion of our video, so that means that anywhere from 0.09 - 3.5 seconds was the time of max height.
Max Height:
To figure out our rockets max height we must first need to find the angle of
our rocket. To do this, Kailtlin and I had to figure out which of the SOH-CAH-TOA formulas we must used based on the information we already know. We already know that our rocket launch makes a right angle and that the measurements we already have are on the adjacent and opposite sides of our right angle. This means that we will be using the formula TOA to find the missing side of our right angle, which is the hypotenuse. The mathematical formula for TOA is TOA = tan(angle from horizontal) = oppadj, and if we put our specific measurements into that formula we get TOA = tan(32.5) = y200. To get rid of the 200, we had to do the opposite of division on both sides, so we multiplied both sides by 200. Which left us with the equation y = 200tan(32.5) and after that we ended up with y = 127.41ft as our max height. Before we finalize our calculation we have to add 4.75 ft to our 127.41ft because that represents the height of the inclinometer. So this means that our final answer for the max height of Kailtin and I’s rocket is 132.16ft!
Initial Velocity
To calculate our initial velocity we used the formula h(t) = -½ (g)(t2) + Vo(t) + yo and in this specific formula Vo= initial velocity, h(t) = vertical position given time, t = time in seconds, g = gravity (32ft/s2), and yo= starting height (1.5ft). After plugging in our calculations to this formula we received 132.16 = -16(0.9)2 + Vo(0.9) + 1.5. Once we had solved that it lead us to
Vo = 159.57.
Theoretical Flight Time
Finally, using the formula for our height at any given time Kaitlin and I were able to identify what our A, B, and C variables were so that we could plug h(t) into the quadratic formula. If
h(t) = -½ (32)(t2) + 159.57t + 1.5 then that means our a = -½(32) = -16, b = 159.57, and c = 1.5. The quadratic formula is: -b b2-4(a)(c)
X =
2(a)
After we plugged our number into that we got: -159.57 159.572-4(-16)(1.5)
X =
2(-16)
We solved the quadratic formula and ended up with 14.76 seconds as our theoretical flight time!
Kaitlin Mccullough
Rocket Reflection
This project was quite a challenge. There wasn't much-guiding help on the steps to creating the rocket. And with neither of us having much prior rocket-making experience it was definitely challenging to get started with a rocket plan. To overcome this challenge we did some research on rockets online. And brainstormed between each other ideas we thought could possibly work. Once we came up with a plan we created our blueprint and got it checked off. Next, we started building and we ran into another challenge. There was a misunderstanding between our blueprint and it getting signed off and we found out our rocket would not work after we had already started it. We were pretty upset but we got new supplies and started over and refined the part of the rocket that would not work. After refining, it ended up working really well and we are really happy with the final product!
After we refined and had our final product there were a lot of successes to come! On our first test launch after refinement, our rocket went 200 ft in the air! It was the highest height in the class so far! It was really exciting to see it work so well after the frustrating process we had gone through. We made a couple more refinements to the parachute deployment system for the final competition. And at the final competition, our rocket went 204 ft and the parachute deployed so it was officially in the running! At the end of the competition, we were in 3rd place which was super exciting! My biggest advice for someone creating this project in the future is to think of it simply. Don't overcomplicate it especially if you don't have many weeks to work on it. We only had one week to create these rockets which are not that long! I saw many people try and create overcomplicated projects and completely fail their rocket launches due to lack of time.
My turning point for this project or the moment when I really got excited about that project was after our first launch. Before that moment I wasn't really excited about the project yet we were working well it just wasn't fun or thrilling yet. But after we went up there and launched it was super exciting. Seeing our rocket go 200 ft was really cool. And watching all of the other rockets go up was really cool. After that, I was excited to go watch the competition and see whose rocket went the highest. We ended up getting 3rd place which was exciting. I think having the positive attitude shift was really beneficial for me and my mindset. After that first launch the rocket got a little bit demolished, but I wasn't angry or sad instead I had a positive attitude and just went back and got the rocket refined and fixed up with a good attitude.
I learned many lessons throughout this project. The first lesson I learned was how to use perseverance even when you feel like giving up. It was really difficult having to start over but I took a day to think about what was going on and how I could persevere through it. The next day I came back, started over, and figured it out. Another lesson/ useful skill I used was communication. It has been a super hard year for many and the miscommunication on our project that led us to start over was incredibly frustrating. My partner and I were really upset and had to take the rest of our class day to figure out a new plan and take a breather on the frustration we were having. The next class day we came back and had a conversation with our teacher about what had been challenging and why this miscommunication was so frustrating. It was overall a good conversion that helped us move forward in our project and in our minds. Communication is such a useful and necessary skill for everyone to have. You can use it with friends, jobs, family and so much more. And lastly, I used the skills of the engineering design process. First I had to find my rules and constraints. Second I had researched rockets and imagined what mine could look like. Next, I created a plan and drew it out. Next, I created my first rocket a couple of times until it met the constraints. Finally, I tested it and fixed any issues and then had my final rocket. In doing this I went through all of the engineering design process steps. These steps are useful when creating projects in real life and in school. These steps keep you on track and lead you to success and I got a lot of good practice with them!
If I did this project again with the knowledge I have now I might create a more complex rocket. But if I were doing it again without the information I have now I would not change much except to make sure my blueprint will work. But if I did it with my knowledge now I think I would probably splice and add the tube thing on the top because those rockets were the most successful. I think I would also try and find more information online about these rockets and the best way to create them. That way I could come up with answers to my questions by myself and not get stuck constantly along the way. Because being stuck when you only have a couple of days to build is a time waster and leaves you behind. I think I would also stick to simplicity though considering there were many people who tried to make really complicated rockets just for them to barely work. So I would probably keep my wings simple and parachute simple sense those worked really well.
Video Link: Rocket Videos